It was a great day we laughed the whole day and just reminisced, I knew it was a golden moment, one that I would always treasure. She had soooo many that adored her, so I a day, a car ride, I felt so blessed for the time, for the memory . . . and then 11-11-11 was the day my friend Grace who was fun and humble, and the epitome of Grace left this world I miss her but it brings me joy to think about the lessons she taught me. Now as many of you, I have been following Lil Blue Boo and her journey and she too is so inspiring and is such and example of making things happen and learning something new each day, creating and discovering the good in those around you . . . . So as I say my prayers each day I have asked God to use me, use what talents I may have to help others, and so one day that started out like any other . . . I ran into a past student now my children's age (32 ish) at my school I worked for years in the Library. She told me her second grader had been diagnosed with leukemia and of course this is such scary news, without so much as a second thought I offered to drive each week and do art with her. We have been doing this a month now come this Tuesday, an I am so blessed to have this time with her. She has finished her first round of chemo and her hair is falling out. Her dad and brother shaved their heads and I have decided to make hats for them.
Sewing the open side closed, I pressed the seam open on this first one but on the others I surged this seam to give it a more finished look.
Then with the tube of fleece still inside out the top of the hat is rolled down 5 " and then stitched all around. The bottom is also hemmed 5 " up and sewn. So at this point you have a tube of fleece now 18 " tall.
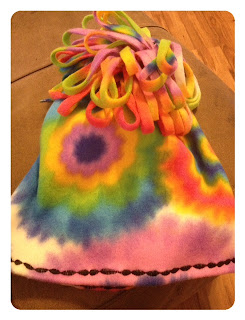
The end of the tube you determine to be the top is cut downward with sharp scissors at 3/8" intervals to make the random strips at the top of the hat. The bottom can just be rolled up as a cuff around the child's face. The cutting of the strips was probably the most time consuming part of this project because I was meticulous to cut the strips straight. Also you can add a decorative stitching to the border of the hat if you want . . . go wild! I did I have a new Brother machine so of course had to experiment! :-)
It dawned on me that you could cut these before you sewed the seam to make the fleece into a tube. Then the fleece would be flat and you would just sew the seam up to where you started cutting the strips. Play with it and decide what you think is easiest. The final part of creating the finished hat is to run a basting stitch by hand right around the top seam of the hat. I used just a heavy upholstery thread to stitch around and then I just pulled and gathered the fleece together evenly as tight as I could. There will be about a one inch hole but I thought this might be good for ventilation. I tied the strings as tight as I could and knotted them many times.
With all the tangle of strips you cannot even see the basting. Hope you like this design. The fleece is so colorful and since we just finished a color wheel project, I thought this rainbow color floral design was perfect. Let me know what you think? PS This friend is thriving . . . seven years later 2019
~Anne ~


No comments:
Post a Comment